Lets make a Ghost Blog

In a place you can’t quite remember, beyond an old forest in a town by the sea, there is an old shop (a place you might have seen in your dreams). Peer through this shops window and what will you see?
In this case, someone building their own ghost blog. Here at the Puttering Dev, we don't just believe in building cool things, but also showing others how cool things are built and in encouraging others to build cool things. And if you found this post, you're likely looking for some advice on how to get started hosting your own ghost blog. Maybe you hosted your own website back in the day and are looking to bring it back, maybe your looking to learn some new IT/DevOps skills, maybe you just want a place to post your content that's under your control. Whatever the reason, we can help you get started. In this post we will cover, how to setup your host machine, how to install and configure ghost, how to securely expose it the internet, and additional security measures you can implement to protect your Ghost Blog.
required materials
- 1 host computer with Docker installed
- 1 web domain
- 1 Cloudflare account (free tier and up)
- 1 mail gun account (free tier and up)
Host machine
Before we dive into the code, we need a place for our blog to live. We’ll be using Ghost, a powerful, open-source CMS built on JavaScript. While Ghost is lightweight, it does have a few hardware "must-haves" to run smoothly.
|
Component |
Minimum |
Recommended |
|
OS |
Linux |
Linux |
|
RAM |
1GB |
2GB+ |
|
Storage |
20GB |
50GB+ |
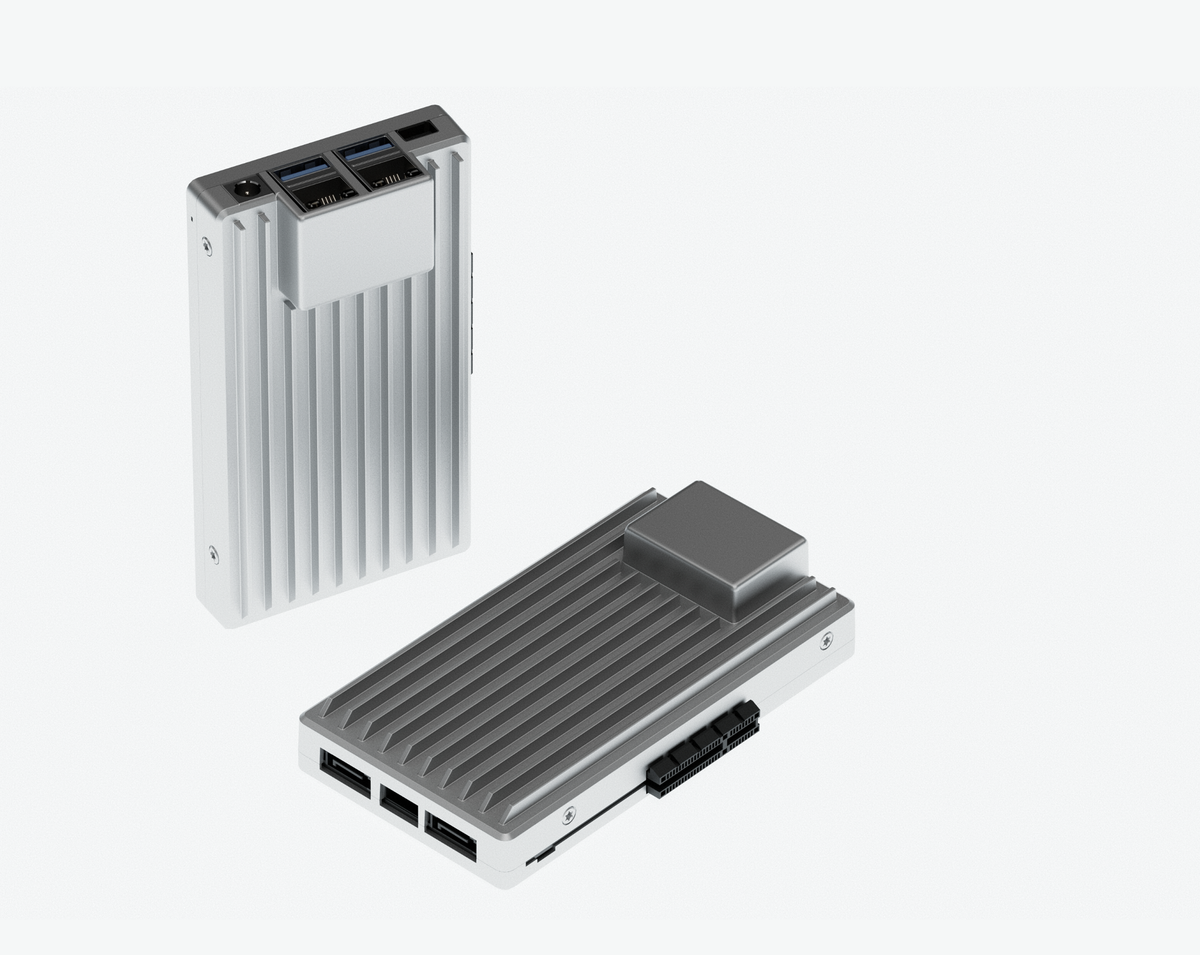
Hardware Choice: ZimaBoard 2
You can host Ghost on anything from a Raspberry Pi to a GMKtec Mini PC, but for this guide, we are using the ZimaBoard 2.
It’s a fanless x86 single-board server featuring:
- CPU: Intel N150 Quad-Core
- RAM: 16GB (Overkill? Maybe. Future-proof? Definitely.)
- Storage: 64GB eMMC
We’ll be running ZimaOS, a Linux-based operating system designed for personal servers. Its clean interface makes managing our software stack significantly easier for beginners and pros alike.
With our "server brain" picked out, the next step is securing a domain name.
Setting up your domain
You can’t have a blog without an address. Most domains run $10–$30/year. While Porkbun is a fan favorite for its pricing, I recommend Cloudflare for this project. Using one provider for your domain and your security (we'll use Cloudflare’s Zero Trust Tunnels later) keeps things simple.
To buy your domain:
- Create a free account at Cloudflare.com.
- Navigate to Domain Registration > Register Domains.
- Search for your name, click Purchase, and follow the checkout prompts.
Note: If you already own a domain elsewhere, you’ll need to point your Name servers to Cloudflare. You can find a tutorial on how to do that here
Since Ghost uses email for two critical things: Staff logins (2FA) and Newsletters. Since we're self-hosting, we need a reliable "sending" service so our emails don't end up in spam. Mailgun offers a solid free tier (100 emails/month) which is plenty for a personal blog.
Link Your Domain
- Create a Mailgun account and go to the Sending tab to add your domain.
- Pro-tip: Since we’re using Cloudflare, use Mailgun’s Automatic Configuration. Just log in to Cloudflare when prompted, and it will handle the DNS records for you.
Create an API Key
- Under Sending > Domain Settings, create a new API key named "Ghost."
- Important: Copy this key and save it somewhere safe (like a password manager). It will only be shown once!
Setup SMTP Credentials
Ghost needs these to "hand off" emails to Mailgun.
- Go to Domain Settings > SMTP Credentials.
- Click Add New SMTP User.
- Create a name (e.g.,
[email protected]) and choose Automatic Password.
- Important: Save this password immediately. If you lose it, you’ll have to delete the user and start over.
Now our domain is fully setup and ready to support our ghost blog. The next thing we will need to do is install all of the software necessary to run ghost on our host machine and get a bit better acquitted with Linux in the process.
Setting up Ghost
Now we have our host machine and our domain set to go, now we are ready to configure our host machine. How you do this will differ significantly depending on your the version of Linux you are running but, in general we need to install the following applications.
- Docker: The engine that runs our apps in isolated "containers."
- Portainer: A visual dashboard to manage those containers.
- Ghost: Our actual blog platform.
- Cloudflared Tunnel: The secure "bridge" that connects your local server to the internet.
This part of the tutorial will be dived into two parts in the first part we will setup our ghost blog in ZimaOS and in the second part we will setup our blog on a computer running Ubuntu (a Linux distro based on Debian).
ZimaOS
ZimaOS makes this incredibly simple via its built-in App Store.
- Install Apps: Go to the App Store and install Portainer, Ghost, and Cloudflared.
- Configure Ghost:
- Click the three dots (⋮) on the Ghost icon > Settings.
- Change the
URLvariable fromlocalhosttohttp://[YOUR-LOCAL-IP]:2368. - Click + Add to insert your Mailgun SMTP variables (see the SMTP Settings block below).
- Launch: Open Ghost, navigate to
http://[YOUR-IP]:2368/ghost, and follow the setup wizard.
The list of key you will need to add to Ghost to enable Mailgun are
      mail__transport: SMTP
      mail__options__service: Mailgun
      mail__options__host: smtp.mailgun.org
      mail__options__port: 587
      mail__options__auth__user: [email protected]
      mail__options__auth__pass: your-smtp-password
Ubuntu
If you're on Ubuntu, we’ll do this via the terminal (Ctrl + Alt + T).
Install Docker
sudo apt-get update
sudo apt-get install ca-certificates curl gnupg lsb-release -y
sudo mkdir -p /etc/apt/keyrings
curl -fsSL https://download.docker.com/linux/ubuntu/gpg | sudo gpg --dearmor -o /etc/apt/keyrings/docker.gpg
echo "deb [arch=$(dpkg --print-architecture) signed-by=/etc/apt/keyrings/docker.gpg] https://download.docker.com/linux/ubuntu $(lsb_release -cs) stable" | sudo tee /etc/apt/sources.list.d/docker.list > /dev/null
sudo apt update && sudo apt-get install docker-ce docker-ce-cli containerd.io docker-compose-plugin -y
Install Portainer
docker run -d -p 8000:8000 -p 9443:9443 --name portainer --restart always -v /var/run/docker.sock:/var/run/docker.sock -v portainer_data:/data portainer/portainer-ce:latestAccess Portainer at https://[YOUR-IP]:9443 to set your admin password.
Deploy Ghost Stack
In Portainer, create a new Stack and paste this configuration (make sure to update the placeholders):
services:
  ghost:
    image: ghost:5-alpine
    restart: always
    ports:
      - 2368:2368
    environment:
      url: http://[YOUR-LOCAL-IP]:2368
      mail__transport: SMTP
      mail__options__service: Mailgun
      mail__options__host: smtp.mailgun.org
      mail__options__port: 587
      mail__options__auth__user: [email protected]
      mail__options__auth__pass: your-smtp-password
Regardless of your OS, once Ghost is running, you must link your Mailgun API to do this you
- Log in to your Ghost admin panel (
/ghost). - Go to Settings > Email newsletter > Mailgun settings.
- Enter your Mailgun Region, Domain, and API Key.
- click Save.
Your blog is now fully configured! I recommend writing a test post and poking around the settings locally before taking it live. Once you're happy with how it looks, we’ll move on to taking it live to the world.
Going live
At this point we have got our host machine setup, we have installed and configured ghost and we have written a few test post for new blog. Now we are ready to expose the blog to the internet, to do this We’ll use a Cloudflare Zero Trust Tunnel. This creates a secure, outbound-only bridge between your server and the internet. The best part? No port forwarding required, and your home IP address stays hidden.
Create the Tunnel (Cloudflare Dashboard)
- Log in to Cloudflare and go to Networks > Tunnels.
- Click Create a Tunnel, name it "Ghost Blog," and save it.
- Choose your environment:
- For ZimaOS: Copy the Token (the long string of random characters).
- For Ubuntu: Select Docker and copy the entire command provided.
Connect Your Host
- ZimaOS: Open the Cloudflared Tunnel app, paste your Token, click Save, and then Start.
- Ubuntu: Open your terminal (Ctrl+Alt+T), paste the Docker command you copied, and hit Enter.
Route the Traffic
Back in the Cloudflare Tunnel dashboard:
- Go to the Public Hostname tab and click Add a public hostname.
- Enter your domain (e.g.,
myblog.com). - Under Service, set the type to HTTP and the URL to your local IP and port (e.g.,
192.168.1.2:2368). - Security Check: Go to SSL/TLS > Edge Certificates and toggle Always Use HTTPS to On.
Now that the tunnel is open, we must tell Ghost its new identity.
- Update the URL:
- ZimaOS: In the Ghost app settings, change the
URLenvironment variable from your local IP tohttps://yourdomain.com. - Ubuntu: In Portainer, edit your Ghost Stack YAML to update the
url:line, then redeploy.
- ZimaOS: In the Ghost app settings, change the
- Restart: Restart the Ghost container.
If everything is setup correctly, you should be able to type your domain name into your web browser and see your new blog!
Conclusion
Congratulations! You’ve successfully moved from a "blank box" to a fully functioning, secure, self-hosted publishing platform. Here’s a recap of what we accomplished:
- Provisioned a host machine (ZimaBoard/Ubuntu).
- Secured a domain and configured Mailgun for reliable email delivery.
- Deployed Ghost and Portainer via Docker.
- Exposed the site safely using Cloudflare Zero Trust Tunnels.
What’s next? Dive into the Ghost Tutorials to find the perfect theme and start writing. Special thanks to Jeremy at Noted.lol who's own tutorial on setting self hosting a ghost in your home lab were especially helpful in writing this post. Stay tuned to see what else we can make here at the Puttering Dev.