The beginners guide to bypassing government media restrictions
If you’ve been following the news lately, you’ve probably noticed an uptick in age verification laws for accessing online content. In theory, these laws are designed to keep minors from accessing sensitive material or at least, whatever lawmakers arbitrarily deem sensitive.
If you’ve been following the news lately, you’ve probably noticed an uptick in age verification laws for accessing online content. In theory, these laws are designed to keep minors (usually under 16 or 18, depending on the region) from accessing sensitive material or at least, whatever lawmakers arbitrarily deem sensitive. To enforce these restrictions, end users are required to upload a government-issued ID, submit a selfie, or opt into a government-sanctioned identity management system. This highly sensitive information is then tied directly to your account. While the specific methods vary, the outcome is always the same: they collect your personal data and create massive barriers to a free and open internet.
The stated reason for passing these laws is to protect children from harmful content like predatory algorithms, hate speech, and pornography. But the actual result (and likely the actual goal) is to severely limit, if not outright eliminate, anonymous speech on the internet. Stripping away anonymity ensures that individuals holding "inconvenient" political beliefs like "genocide is wrong" or "we shouldn't destroy the biosphere to improve quarterly profits" can be easily tracked, harassed, and punished. Furthermore, if you blow the whistle on government misconduct, your browsing habits can conveniently be "leaked" to news sources to discredit you, punishing you for being a snitch.
So, what can we do about it? The best approach is to be an active participant in your democracy. That means yelling at your elected representatives until they back down from doing something evil and stupid and throwing their worthless asses out on the street if they don’t listen. However, the success rate of this method has been... variable, to put it kindly. So, in addition to civic engagement, your old pal the puttering dev is going to show you how to bypass most of these systems. Governments have diligently designed these roadblocks to be airtight, but they all share one fundamental flaw: because no single country owns the internet, the very first step in triggering these blocks is determining your location. If you can make it look like you’re in a place where these incredibly stupid laws don’t apply, you can go about your internet business in peace (or at least unharassed).
There are two ways of doing this. The first is to set up a VPN with its exit node in a safe, unrestricted region. The second is to implement what is called a Smart DNS. You could easily purchase a commercial subscription that preconfigures these services for you, but since this is an open workshop, I’m going to show you how to host them yourself.
VPN
Let's start with the most popular and straightforward method: the Virtual Private Network, or VPN. At its core, a VPN is a technology that establishes a secure, encrypted connection between your device and the internet. It masks your IP address and routes your online traffic through a remote server, keeping your data hidden. Crucially, it hides your true location by running the server side of the network on a machine physically located somewhere else.
You can achieve this by either owning a physical computer in another region or renting a Virtual Private Server (VPS) hosted in a remote server farm. If you decide to use a paid commercial service like NordVPN, all you need to do is register, download the client, select your preferred location, and you're set. But since you're here to learn how to host your own, let's look at the extra steps involved.
Hosting Your Own VPN
The first step to rolling your own VPN is selecting a VPS provider the company that rents you the remote computer. DigitalOcean’s "Droplet" service is the go-to for most folks. A basic plan runs about $6 USD (roughly €5) per month, and if all you’re doing is browsing the web or accessing social media to bypass age gates, that basic plan is perfectly sufficient. However, if you intend to game or stream high-definition video, you’ll likely need the extra bandwidth available in higher tiers. Other popular and similarly priced alternatives include Vultr and Linode, both of which offer servers in multiple countries.
Once you've picked a provider and a safe location, you'll need to choose your hardware configuration. Since all you're doing is hosting a lightweight Linux server that routes traffic, you won't need a beast of a machine. Typically, 1 vCPU and 1GB of RAM is plenty, though all of these providers happily offer more powerful setups if you need them.
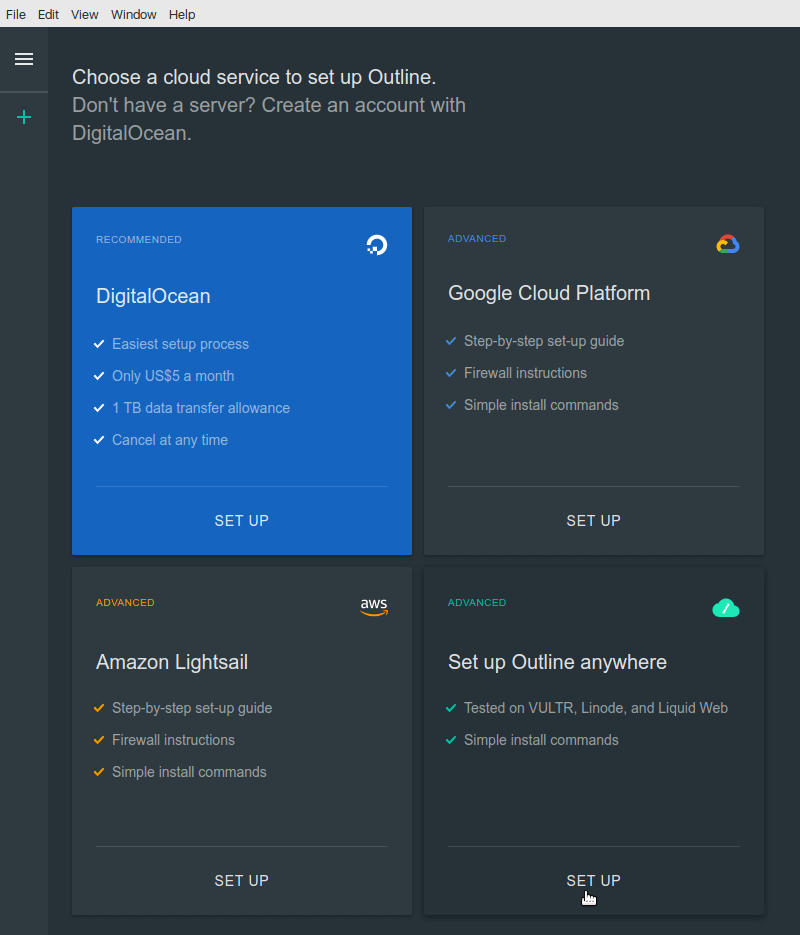
With your provider, location, and hardware sorted, you’re ready to actually set up the software. To keep things relatively simple for this tutorial, we’ll be using DigitalOcean alongside the Outline VPN software. First, we need to deploy a Linux server (a "Droplet") with the Outline software pre-installed. Here is how you do it:
- Log into your DigitalOcean account.
- Click the Create button and select Droplets.
- Under Choose an image, navigate to the Marketplace tab.
- Search for Outline and select it.
- Select a server region outside of your heavily-regulated country.
- Choose a plan size. The Basic Shared CPU tier is more than enough for bypassing blocks.
- Select SSH Key (highly recommended for security) or set a root password for authentication.
- Click Create Droplet.
You now have a Linux server running Outline that can reroute your internet traffic. Next, we need to configure it so your personal devices can connect:
- Download the Outline Manager desktop app to your computer.
- Open Outline Manager, select DigitalOcean, and click Set up.
- Log in and authorize Outline to connect to your DigitalOcean account.
- The manager will automatically configure your server for you.
- Copy the Access Key generated by the manager (and save it somewhere safe!).
- Finally, download the Outline Client to your device, paste your Access Key, and hit connect!
To test that everything is working properly, simply verify that your VPN client is online, then go to a site like WhatIsMyIP. Check that your visible location now matches the region of your new DigitalOcean Droplet instead of your actual living room.
Before moving on to alternative methods, there are a few important caveats regarding your self-hosted VPN:
- Streaming Blocks: Platforms like Netflix, Hulu, and BBC iPlayer actively scan for and block known cloud-provider IP addresses. Your self-hosted VPN will easily bypass government age verification nonsense, but it may still be detected and blocked by premium streaming sites.
- Heavy Censorship: If you live in or travel to heavily censored regions with advanced firewalls (like parts of Russia or China), you will require additional obfuscation tools that are beyond the scope of this article.
- Pseudonymity vs. Anonymity: A self-hosted VPN offers fantastic privacy against snoops on public Wi-Fi. However, because the server is ultimately tied to your credit card and DigitalOcean account, it does not provide true, untraceable anonymity.
While a VPN is a powerful tool, it’s not the only way to disguise your location. In fact, depending on what you want to do, routing all your traffic through a VPN might be overkill. Another, lighter-weight method is to host your own Smart DNS server.
Smart DNS
Smart DNS is a technology used to bypass geo-restrictions and access region-locked content. It works by rerouting your device's Domain Name System (DNS) queries through a proxy server in a different location. This approach has the added benefit of allowing you to spoof your location on a site-by-site basis with minimal performance loss.
However, hosting one yourself is more technically involved than setting up a VPN, and it does not encrypt your data by default. You will need to be comfortable with the Linux command line but hey, there is nothing a government fears more than someone who knows Linux. If you don't want to deal with the technical setup, commercial VPNs like NordVPN offer Smart DNS as part of their service (such as SmartPlay) and will handle the configuration for you.
To host your own Smart DNS, you will first need a domain name. Registrars like Porkbun or Cloudflare can help you grab a cheap one. Once you have your domain, head back to DigitalOcean to set up a Droplet for our Smart DNS:
- Click Create and select Droplets.
- Choose an Ubuntu Linux image.
- Select a geographic region closest to the content you want to unblock (or simply outside of your restricted zone).
- Choose a basic plan (e.g., $6/month).
- Create and assign an SSH key for secure server access.
- Click Create Droplet.
Configure Network and Firewall
Next, we need to configure the DNS and firewall settings for our new Droplet:
- Allocate a Reserved IP (Floating IP) to your Droplet so your Smart DNS IP never changes.
- Go to Networking > Domains in the DigitalOcean control panel and add your domain name to manage its DNS records.
- Log into your domain registrar (where you bought the domain) and point the name servers to
ns1.digitalocean.com,ns2.digitalocean.com, andns3.digitalocean.com. - Configure the Droplet’s firewall to allow incoming traffic on ports 53 (DNS), 80 (HTTP), and 443 (HTTPS).
Install and Configure Tools
Now we need to install our DNS and proxy tools. Open your terminal or command prompt, log into your Droplet via SSH, and install the required packages:
sudo apt update
sudo apt install dnsmasq sniproxy
First, we will configure Dnsmasq, which listens for DNS queries and routes them correctly. Open /etc/dnsmasq.conf in your preferred text editor and make the following changes:
- Set the server to listen only on your Droplet's IP:
listen-address=YOUR_DROPLET_IP - Define your upstream DNS servers (e.g., Cloudflare or Google):
server=1.1.1.1
server=8.8.8.8
- Force specific domains to resolve to your Droplet's Reserved IP. For example, to redirect a site, add:
address=/example.com/YOUR_RESERVED_IP. Next, we need to set up SNI Proxy. This tool looks at the requested hostname and forwards the connection securely without decrypting it. Edit/etc/sniproxy.confand ensure the listener block allows HTTP and HTTPS traffic. Then, define a table that redirects traffic for your targeted domains to the proxy. Finally, restart your services to apply the changes:
sudo systemctl restart dnsmasq
sudo systemctl restart sniproxy
To use your new setup, simply change the DNS settings on your target device (e.g., Apple TV, Smart TV, router, or PC) to your Droplet's Reserved IP, and you are done. You are now using your own Smart DNS and are ready to bypass your nation's age verification laws.
The Nuclear Option: Tor Browser
There is one more possible way around these laws. If you live or work in a highly sensitive country, or simply want an extreme level of security when browsing the web, you should consider using the Tor Browser.
The Tor browser implements the Onion Routing protocol, which encrypts and randomly bounces your communications through a network of volunteer-run relays around the globe. These routers employ encryption in a multi-layered manner (hence the "onion" metaphor) to ensure perfect forward secrecy between relays, providing users with true network anonymity.
You should bear in mind, however, that bouncing your traffic across the globe causes significant performance degradation. It is generally not recommended to use Tor for streaming media, and most corporate social media sites actively block known Tor exit nodes by default. So, for the purposes of bypassing age verification laws on standard websites, a self-hosted VPN or Smart DNS is highly recommended over Tor.
Things to remember
Before you go off to set up your new VPN or Smart DNS, there are a few final things you should keep in mind:
- VPS providers are corporations. If sufficient legal or government pressure is applied, they will rat you out. Do not trust DigitalOcean, or any other hosting provider, to have your back.
- No solution is bulletproof. If you just want to bypass age gates and browse the web in peace, these methods will work perfectly. However, the more trouble you cause, the more the state will focus its tools on you and the higher the chances you will be caught. With sufficient time, expertise, and resources, even Tor traffic can be de-anonymized. Be smart, and be careful.
Stay tuned to see what else we are cooking up here at The Puttering Dev!